Subaru GC8 WRC99 Livery Kit
Subaru GC8 WRC99 Livery Kit is backordered and will ship as soon as it is back in stock.
Couldn't load pickup availability
Description
Description
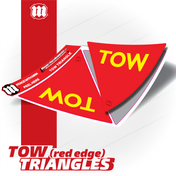
Here we have a GC8 Subaru livery kit replicating WRC99.
You'll get all decals pictured with instructions for install. Packaging will be rolled around a tube, bagged then boxed.
Install difficulty: medium, hard on some sections.
Here's how we got to designing, printing and installing this livery.
"Angus from AJ Autos (Castle Hill, NSW) reached out to us, after one of other clients, had just praised us so highly for a recent wrap we completed for them. Angus has been chasing a designer and print shop who not just deliver his dreams, but blow his expectations out of the park.
Oh gosh, we got some big shoes to fill! Half an hour on the phone, Angus was convinced he found his match. His goal was to pay homage to the Prodrive WRC99 livery, a perfect choice for his World Rally Blue WRX (GC8)
We got straight to work. The first stage is studying the car, the livery, it’s history and what brands, logos, and stickers had a place. This took hours. Almost a 20 year old livery, came with the challenges that some logos where extinct. Like IHI Turbo, we redrew and vectorised a logo perfectly.
Starting with prep, two-bucket wash, clay bar, and a quick paint correction on the boot lid. Moving to install, we used Arlon SLX, and a dream to work with - graphics applied by within a day.
My favourite part is the unveil. Angus arrived “I’m here,” he text. I can feel his excitement. Up come the roller doors staring him in the face, Angus grinning as a kid on Christmas. Biggest handshake and he quotes "it's spot on, color, placement and well replicated".
This was one of those jobs where everything worked — the car, the client, the craft. We heared that rumble, now dressed in full WRC99 glory, and certainly feel proud.
Sick!" - Troy Seven #25
Sometimes, installing your first sticker maybe daunting, but with our MRN products, and some helpful tricks to boost your confidence - you'll be fitting up the entire scrutineering line with decals.
-----
Did you know!
You may get given a decal with application tape. Referred as app tape, it's typically used to keep separated vinyl together. For example, a Drivers' Name. Other decals may not require the app tape.
-----
Some tips!
Placement. This one is up for debate, but rule of thumb is:
- Race numbers - located upper most front section of the front doors. For aesthetics, angle the number panel along the natural lines of the car. Works for most other graphics too!
- Windscreen banners, measuring from the centre point of windshield, the total height is around 120mm +/- (street car) to 240mm +/- (race car). Use masking tape to hold into position, then inspect from afar back and also in the cockpit, adjust height accordingly.
Tools needed.
- You'd preferably want a squeegee, extra points if it's felt tip. At last resort, use a credit card wrapped in a microfibre cloth
- Scissors, or preferably a 30-degree safety knife (make sure it's new and sharp).
- Masking tape, or magnets
- Surface cleaner, either Isopropyl Alcohol or Avery Surface Cleaner. Don't use Glass Cleaner.
Cleaning the surface. Don't skip this step. After washing your car, avoid using any waxes. Using a clean microfibre towel and your cleaner, thoroughly spray the outer panel and wipe clean, twice! Do so again behind all door jams, body gaps, under rubber moulds, and all. Anywhere within 200mm of your installation area.
Installation Guide.
Step 1: Clean, Position and Tape
Clean thoroughly your doors from any oils, grime and dirt using either an isopropyl alcohol or similar cleaner and a microfibre towel.
Using masking tape, apply horizontally across the uninstalled sticker with 3” overhang, tacking it to the door/bonnet. Step back 5-10m, check for alignment, angle and position. This tape, is called your “hinge”

Step 2: Peel and Trim
Once the hinge is secured to the body, carefully peel the vinyl away from the backing paper up to the hinge line. Using scissors or a blade, trim off the exposed backing. Be careful not to scratch your paint with a blade!

Step 3: Start Squeegeeing
Using your MRN felt-tipped squeegee (or a credit card wrapped with cloth), apply left and right upward overlapping strokes, with medium to firm even pressure.

Step 4: Peel & Work Downward
Now you can remove the “hinge” masking tape. Using the same overlapping squeegee left and right strokes, begin to slowly peel the remaining backing paper downward, working methodically.

Step 5: Continue Stroking til the end
Repeat the left and right overlapping strokes with medium pressure, downward as the backing paper is relieved. Ensure all the edges are sealed down.

Step 6: Admire and Conquer
Once complete, step back, admire and measure placement to make the other side symetrical. You’re a master installer now!
And as your MRN Graphics provide at least 5hp, you should also be expecting faster lap times :) Please write us a review, tag us on socials, and share MRN within the pitlane.

Thank you,
Troy Seven
Race fast,
Troy Seven #25
Magnet Race Numbers.


Subaru GC8 WRC99 Livery Kit
Payment & Security
Payment methods
Your payment information is processed securely. We do not store credit card details nor have access to your credit card information.